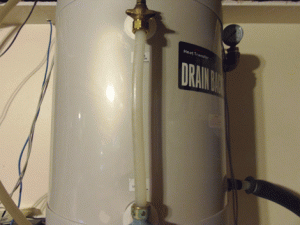
Here’s a service tip for those whose systems use an HTP drainback tank – specifically on the maintenance or replacement of the sight glass. The sight glass is the transparent tube that lets you know the water level of the drainback tank when both the pump is pumping and when the system’s drained down.
This is the pex repair on a system’s drainback tank, in which the glass has been replaced with a piece of ½-inch pex tubing that is not opaque. It’s difficult to see, but the water mark is at the half mark.
I received a call last week from a man who installed his solar system about two years ago. He’d noticed that a slight crack had formed in the sight glass, just below the water level. And as time progressed, the sight glass started to drip. He shut down his system and removed the sight glass, but was unable to repair it. So he ordered another one. Meanwhile, the system’s not working until the replacement arrives.
I suggested a repair – which can be either permanent or temporary – that has worked on my system: Replace the glass with a piece of ½-inch pex tubing that is not opaque.
The pex fits perfectly into the same connections as the factory sight glass. Pex has a temperature rating of over 400 degrees with no pressure, so it’s an excellent, industrial material for this application. I used Wirsbo pex for the 10-gallon drainback on my system. The length you’ll need depends on the size of the tank, but my tank required about 11 inches.
Earlier HTP drainback models seemed to have some flexing in the stainless steel tank and occasionally would break the sight glass. Also, sometime after years of exposure to heat, the sight glass simply needs to be replaced
That’s probably the question I get asked more than any other: Should I choose the more popular pressure-glycol system, or go with a drainback system?
Here’s the answer: It depends.
Don’t you hate that kind of answer? Well, here’s a more specific answer: If the slope of the collectors and plumbing is such that all the fluid will drain out, then go with the easier and less expensive drainback design.
That doesn’t mean I favor one over the other; it really does depend on the building’s design.
Let’s backtrack for a moment. Here are definitions of each type of system.
Solar pressure system: Closed loop arrangement that generally has 20 psi or more at the panels. Besides the panels and the tank, basic components include check valves, expansion tank, air purge and air traps, a pressure relief valve, pump, solar control with sensors and nontoxic antifreeze.
Drainback system: Closed loop arrangement that generally has 10 psi. Besides the panels and the tank, basic components include drainback tank, a pressure relief valve, pump and a solar control with sensors. May or may not contain antifreeze.
The virtues of each system type:
Solar pressure system: Pressure systems generally contain glycol to provide freeze protection.
Drainback system: A properly designed closed-loop drainback system provides freeze protection without glycol as well as overheat protection due to the absence of fluid in the panels when either condition exists.
Let’s start with the more popular pressure glycol-filled system:
Pressure systems take time and patience to fill, charge and purge all the air out. If some air remains, controlling the flash point may be impossible.
A pressure system must be in perfect balance to handle the expansion of fluid when the pump isn’t pumping — such as a power failure or when the tank is satisfied. You must have a properly sized expansion tank that is kept at a consistent parallel pressure with the glycol loop pressure. Will this pressure stay exactly the same forever? Nope, every year you need to check and recharge the system.
And what happens if the closed-loop system pressure drops a few pounds below where you set the expansion tank pressure? The system will eventually blow antifreeze all over — via the pressure relief valve. The reason is that water-to-steam expansion is immense — 1,172% to be exact. When the pump shuts off during, say, a hot summer day, the fluid in the panels will go to boiling point and flash to steam if it is not in perfect balance.
Let’s say that we have a collector that holds one gallon of water. If the system pressure to expansion tank is maintained in concert and the pump shuts off under full sun, the panels will build heat slowly and the fluid will start to phase-change. That one gallon of water will start to phase-change and expand; it will push fluid out of the collector and down the pipes where it will stay condensed (as fluid). Eventually, you will have one gallon volume of steam in the collector and the gallon of water you pushed out will be in the expansion tank. If there is air in the system or the system pressure is not in harmony with the expansion tank, violent boiling will transfer down the plumbing, expanding several gallons of water by the aforementioned 1172%, out of control.
When the system is in balance, only a small amount of fluid will expand that immense amount, likely filling the collector’s one-gallon capacity.
Because of this, larger systems should use a constant pressure auto-fill device.
The closed-loop drainback system:
A drainback system is a fluid-filled closed loop with an air bubble and a small tank to isolate and capture the air when the pump comes on. When the pump is switched off, the heavier water drops from the panels and pushes the air bubble back up into the panels and exterior plumbing. If the tank is satisfied or the power fails, the pump will be off, and no water will be in the panels to flash to steam. No fluid to expand, no need for expansion tank. It’s the same for freezing — when the temperature at the panels drop below freezing, there is no water in them to freeze. Fewer safety measures need to be considered.
However, a pressure glycol system will need to be considered if the slope for panels and plumbing cannot be achieved to drain all the panels’ fluid into the drainback tank.
Advantages of using some pressure
I would recommend you add a small amount of pressure in a closed loop drainback system, for two reasons. First, it will confirm you have integrity in your closed loop. If you have a completely sealed system, the air will go inert and turn mostly to harmless nitrogen.
Second, if you fill and close up the system when it’s warm, then at night when the panels get cold, the closed loop will go into negative pressure and start boiling the stored fluid in the drainback tank when it is at room temperature.
Pump and pump sizing rules change considerably with a drainback system. Pump size will be determined by the lift required to deliver from the drainback tank to the top of the panels. After the pump has overcome the lift to the panels, it’s important to have the variable solar pump speed control slow the pump down.
A variable-speed pump control should be used on both pressure and drainback systems to keep solar heat transfer to a maximum based on Delta T. Over-pumping a solar loop may void the panels’ warranty. Consider raising the drainback tank as high as possible in the building (within conditioned space) to allow a smaller pump. The pump should be sized to deliver the GPM needed for the solar and the lift from the drainback tank to the panels.
Red vs. Blue. Tastes Great vs. Less Filling. Kirk vs. Picard. Epic battles for which there really are no right answers. Enter into that pantheon the great debate between flat plate vs. evacuated tube solar thermal collectors. The answer, much to the chagrin of the true believers on either side is: it depends. Let’s first briefly look at the two types of technology.
Flat plate solar thermal collector:
The flat plate collector has been around forever (at least since the 1890s). An insulated box, with glass on one side and copper tubing running through absorber plates is the basic design for flat plate collectors.
Evacuated tube solar thermal collector:
Instead of evacuated tube, think thermos bottle. Each tube is actually its own mini-collector. A clear thermos bottle allows sunlight in, an absorber plate absorbs more heat, and the vacuum holds the heat in. Most designs have a heat pipe – a small diameter, sealed copper pipe inside the thermos bottle. Inside the heat pipe water, antifreeze, alcohol or some other medium, under a mild vacuum, flashes to steam around 80F. So the liquid heats up, turns to steam, rises in the heat pipe to the heat exchanger (usually a larger section of the heat pipe dry fitted to the water-or-glycol carrying header), gives up its heat, turns to liquid, flows to the bottom and repeats the cycle.
Comparison of generic evacuated tube and flat panel collectors
Evacuated tube*
Flat plate*
Dimensions
9’X7’X6”
4’X10’ X4”
Weight
250 pounds
150 pounds
Effective absorber area
~30 square feet
~38 square feet
Piping
Top only
Top and bottom
Max weight per heaviest piece
105
150
BTU output
Depends
Depends
*off-the-shelf, readily available models. The point is not a particular brand/model, but roughly comparable panels between the two styles.
Each type has a role to play, depending on where the project is, and what the heating needs are. If you are installing a solar water heater in Phoenix, the flat plate solution is the obvious choice. If you are installing a space heating system in Burlington,VT, evacuated tubes are the obvious choice. Almost anything in between requires some analysis.
To start the analysis, let’s look at price, performance and ease-of-installation.
Price
The advantage goes to flat plate collectors, but not by as much as is typically assumed. For example, general prices for the two panels above are: flat plate: about $1,100; evacuated tube about $1,400. How and if discounts are available from list prices is a whole other subject in the game of solar.
Performance
Regardless of price, how much energy can we get from a panel? Here we will use data from the SRCC OG-100 tables. Data for any rated panel can be found here: http://www.solar-rating.org/ratings/og100directories/OG100dirfull.pdf. Because panel performance varies greatly, you should check the specific performance of the panel you are considering. The table (click to enlarge) is based on three different sunlight conditions: Full sun, partly cloudy and cloudy. At those three conditions four different temperatures were tested (the temperature is the difference between the outdoor temperature and the water you are heating at the inlet to the collector). Pool 1 is an estimate of pool heating requirements in a warm climate; Pool 2 is an estimate of pool heating requirements in a cool climate; the same applies to DHW 1 and DHW 2. Black plastic pool panels are recommended for seasonal pool heating.
Somewhere in row C the performance per panel begins to favor evacuated tube collectors. Note that this compares a ~55 square foot evacuated tube panel with a ~40 square foot flat panel. If you are minimizing the solar footprint on the roof, flat plates probably win (but you may not get the performance you want in the winter). This graph presents the same information in a slightly different way.
As you can see from the chart, somewhere between 70 and 80 degrees Fahrenheit delta T between your incoming water at the solar panel and the ambient air, the evacuated tube is more efficient. An example would be heating 120°F water when it is 40°F outside. The 80°F differential is right at the efficiency crossover. This is a typical case for overnight storage in a solar hot water heater. You want to heat the water to 150°F or higher so you can use that heat energy for night-time and early morning hot water demand.
However, if your ambient temperature is 50°F or 60°F then the flat plate is more efficient almost the whole time. The ambient temperature we are considering is the average from 9am to 3pm (the solar window).
Now let’s consider space heating – as a stand-in for winter, we will assume partly cloudy conditions (~800 watts/square meter)
Now the crossover point is about 60°F. If the outdoor temperature during the solar window is 40°F then heating water over 100°F benefits (at least slightly) from evacuated tube collectors.
Ease-of-installation
If you are a one man crew, the evacuated tubes are the hands down winner. Other than that, the flat plate wins. Flat plates are big, heavy and bulky. Full roof harness safety gear for a pitched roof and some sort of mechanical lift are required to get them on the roof safely. A 3 to 4 man crew can muscle them up by hand, but even with a full crew this is a challenging step in the process.
Both styles require some frame to attach to, and typically require a tilt-angle frame to lift them away from parallel to the roof. The panel or panel header/frame is set in place once the tilt-angle frames are built and installed. It will take a few people to get the flat panel positioned, whereas one person can maneuver the manifold and frame of an evacuated tube collector. While the flat panel is ready for piping, the evacuated tube panel still needs all its tubes put in place (the correct order is complete piping, and then put in tubes). It takes roughly 60 seconds per tube. If you are putting up a single 30-tube evacuated tube collector that is an additional half hour of time. If you are putting up a 10 collector array, that is an additional 5 hours.
Miscellaneous considerations
* The evacuated tube collector is more efficient at chasing a dwindling resource. So the gross BTUs the extra efficiency gets you are not as large – but they may come at the critical time (typically winter conditions).
* Windy conditions affect flat panels much more than they do evacuated tubes (due to the surface area of the un-insulated glass). If your project site is typically windy during the day, you might want to give evacuated tube collectors extra consideration.
* Evacuated tube collectors only require flow through the top (header). This can be very helpful when installing drainback designs (the most efficient freeze-proof design).
* Flat plate panels melt the snow due to their high losses through the un-insulated glass. Evacuated tube collectors are so well insulated they do not melt the snow. If the south facing roof at your location does not routinely melt the snow during a typical winter, flat plates are probably a better choice. The evacuated tubes seem to work well under light-to-medium frost. And they will collect energy when half covered with snow (about half as much as when fully exposed).
Summary
The chart at left (click to enlarge) highlights the advantages of each type of collector. As the issue can be sliced many ways – cost per square foot, cost per BTU, performance per square foot of collector, of absorber, of net aperture, etc., the debate can be never ending.
Tom Scheel is the owner of Radiance Heatingand Plumbing in Flagstaff, AZ. His website is http://www.radianceheating.com/. This article was originally published in Contractor magazine.Originally posted on askrod.com on March 12, 2012.


